前面我们介绍了一些背景知识,主要是理解什么是DNA甲基化,为什么要检测它,以及芯片和测序两个方向的DNA甲基化检测技术。具体介绍在:甲基化的一些基础知识,也了解了甲基化芯片的一般分析流程 。
然后下载了自己感兴趣的项目的每个样本的idat原始文件,也可以简单通过minfi包或者champ处理它们拿到一个对象。
成功下载了数据而且导入了R里面,按照道理应该是要直奔主题搞差异分析啦,但是呢,我强调过很多次,甲基化信号值矩阵是有它的特殊性,虽然分析流程与mRNA那样的表达芯片总体上是一致,几个细节还是要注意的。
再次强调,需要区分:beta matrix, M matrix, intensity matrix from same .idat file ,自行查看我们生信技能树往期教程哦!还有 beadcount, detection P matrix, or Meth UnMeth matrix 这些名词也需要了解。
 beta One single beta matrix to do filtering. (default = myImport$beta).
 M One single M matrix to do filtering. (default = NULL).
 pd pd file related to this beta matrix, suggest provided, because maybe filtering would be on pd file. (default = myImport$pd)
 intensity intensity matrix. (default = NULL).
 Meth Methylated matrix. (default = NULL).
 UnMeth UnMethylated matrix. (default = NULL).
 detP Detected P value matrix for corresponding beta matrix, it MUST be 100% corresponding, which can be ignored if you don't have.(default = NULL)
 beadcount Beadcount information for Green and Red Channal, need for filterBeads.(default = NULL)
就是因为概念名词太多,所以很多人就不愿意去仔细理解甲基化芯片数据。
从ExpressionSet对象拿到甲基化信号值矩阵
通常我们是从GEO数据库下载甲基化信号值矩阵文件,使用getGEO函数导入成为ExpressionSet对象,如下:
require(GEOquery)
require(Biobase)
eset <- getGEO("GSE68777",destdir = './',AnnotGPL = T,getGPL = F)
beta.m <- exprs(eset[[1]])
beta.m[1:4,1:4]
save(eset,file = 'GSE68777_geoquery_eset.Rdata')

## 顺便把临床信息制作一下,下面的代码,具体每一个项目都是需要修改的哦
load(file = 'GSE68777_geoquery_eset.Rdata')
pD.all <- pData(eset[[1]])
pD <- pD.all[, c("title", "geo_accession", "characteristics_ch1.1", "characteristics_ch1.2")]
head(pD)
names(pD)[c(3,4)] <- c("group", "sex")
pD$group <- sub("^diagnosis: ", "", pD$group)
pD$sex <- sub("^Sex: ", "", pD$sex)
head(pD)
save(pD,file = 'GSE68777_geoquery_pd.Rdata')
其中getGEO函数拿到的是ExpressionSet对象,所以可以使用exprs函数来获取甲基化信号值矩阵,那个beta.m就是后续需要质控的。
从minfi的对象拿到甲基化信号值矩阵
使用minfi包的read.metharray.exp函数读取,前面下载的该数据集的RAW.tar 里面的各个样本的idat文件,就被批量加载到R里面,代码如下:
# BiocManager::install("minfi",ask = F,update = F)
library("minfi")
# minfi 无法读取压缩的idat文件,所以需要解压
list.files("idat", pattern = "idat")
rgSet <- read.metharray.exp("idat")
rgSet
save(rgSet,file = 'GSE68777_minfi_rgSet.Rdata')
其中 idat 是一个文件夹,里面有很多idat的芯片原始数据哦。
你需要学习 rgSet 所表示的对象 class: RGChannelSet ,才能进行后续处理,其实也就是学习如何从里面拿到甲基化信号矩阵和表型信息。
从ChAMP的对象拿到甲基化信号值矩阵
同样的是可以读取数据集的RAW.tar 里面的各个样本的idat文件,唯一的区别是需要对你的项目制作一个csv表型文件,示例如下:
[Header],,,,,,,
Investigator Name,,,,,,,
Project Name,,,,,,,
Experiment Name,,,,,,,
Date,3/18/2012,,,,,,
,,,,,,,
[Data],,,,,,,
Sample_Name,Sample_Plate,Sample_Group,Pool_ID,Project,Sample_Well,Sentrix_ID,Sentrix_Position
C1,,C,,,E09,7990895118,R03C02
C2,,C,,,G09,7990895118,R05C02
C3,,C,,,E02,9247377086,R01C01
C4,,C,,,F02,9247377086,R02C01
T1,,T,,,B09,7766130112,R06C01
T2,,T,,,C09,7766130112,R01C02
T3,,T,,,E08,7990895118,R01C01
T4,,T,,,C09,7990895118,R01C02
大多数人的R语言学的不咋地,所以可以考虑在Excel里面整理这个csv表格咯。但是作者一直强调:the user MUST understand their pd file well to achieve a successful analysis.
最重要的是 Sample_Group 列,表明你需要把你的甲基化信号矩阵如何分组后续进行差异分析。
其次是 Sentrix_ID,Sentrix_Position两列,决定你的idat文件名前缀。我代码如下:
rm(list = ls())
options(stringsAsFactors = F)

# BiocManager::install("ChAMP",ask = F,update = F)
library("ChAMP")
require(GEOquery)
require(Biobase)
# 临床信息来自于前面的getGEO函数导
load(file = 'GSE68777_geoquery_pd.Rdata')
head(pD)

fs=list.files("idat", pattern = "idat")
library(stringr)
fsd=unique(str_split(fs,'_',simplify = T)[,1:3])
pd=cbind(fsd,pD[fsd[,1],])

cln=strsplit('Sample_Name,Sample_Plate,Sample_Group,Pool_ID,Project,Sample_Well,Sentrix_ID,Sentrix_Position',
 ',')[[1]]
pd=pd[,c(4,2,6,7,3,1,1,4)]
colnames(pd)=cln
pd[,2]=NA;pd[,4]=NA;pd[,5]=NA
write.table(pd,file = 'idat/sample_sheet.csv',row.names = F,
 col.names = T,quote = F,sep = ',')

myLoad <- champ.load('idat/',arraytype="450K")
save(myLoad,file = 'GSE68777_champ_load.Rdata')
看起来比前面两个方法都复杂很多哦,主要是因为我使用R来制作样本信息表格啦!
我们现在存储了3个数据对象,接下来的质控就针对这3个分别操作哦!
156M Feb 8 15:34 GSE68777_champ_load.Rdata
141M Feb 8 13:45 GSE68777_geoquery_eset.Rdata
607B Feb 8 15:15 GSE68777_geoquery_pd.Rdata
114M Feb 7 23:30 GSE68777_minfi_rgSet.Rdata
因为数据都很大,所以不方便GitHub共享,大家可以自行下载idat的芯片原始数据文件,然后走我里面的代码,肯定是成功的。
除非是你三五年后看到这个教程,有可能R包更新导致某些函数会失效。当然了,这也就是给你提个醒咯,函数和代码是有可能失效的哈。
质控的指标
如果是拿到甲基化信号值矩阵表达矩阵
如果是mRNA表达矩阵,我们通常是看3张图,代码里面我挑选了top1000的sd基因绘制热图,然后就可以分辨出来自己处理的数据集里面的样本分组是否合理啦。其实这个热图差不多等价于PCA分析的图,被我称为表达矩阵下游分析标准3图!详见:你确定你的差异基因找对了吗? ,就是下面的3张图:
- 左边的热图,说明我们实验的两个分组,normal和npc的很多基因表达量是有明显差异的
- 中间的PCA图,说明我们的normal和npc两个分组非常明显的差异
- 右边的层次聚类也是如此,说明我们的normal和npc两个分组非常明显的差异
PS:如果你的转录组实验分析报告没有这三张图,就把我们生信技能树的这篇教程甩在他脸上,让他瞧瞧,学习下转录组数据分析。
同样的道理,针对甲基化信号值矩阵表达矩阵也可以绘制标准3张图咯。首先看看简单的boxplot和密度图,mds图。
# 使用 wateRmelon 进行 归一化
library("wateRmelon")
beta.m=beta.m[rowMeans(beta.m)>0.005,]
pdf(file="rawBox.pdf")
boxplot(beta.m,col = "blue",xaxt = "n",outline = F)
dev.off()
beta.m = betaqn(beta.m)
pdf(file="normalBox.pdf")
boxplot(beta.m,col = "red",xaxt = "n",outline = F)
dev.off()

# 然后进行简单的QC
head(pD)
pdf(file="densityBeanPlot.pdf")
par(oma=c(2,10,2,2))
densityBeanPlot(beta.m, sampGroups = pD$group)
dev.off()
pdf(file="mdsPlot.pdf")
mdsPlot(beta.m, numPositions = 1000, sampGroups = pD$group)
dev.off()
# 后续针对 beta.m 进行差异分析, 比如 minfi 包
grset=makeGenomicRatioSetFromMatrix(beta.m,what="Beta")
M = getM(grset)
# 因为甲基化芯片是450K或者850K,几十万行的甲基化位点,统计检验通常很慢。
dmp <- dmpFinder(M, pheno=pD$group, type="categorical")
dmpDiff=dmp[(dmp$qval<0.05) & (is.na(dmp$qval)==F),]
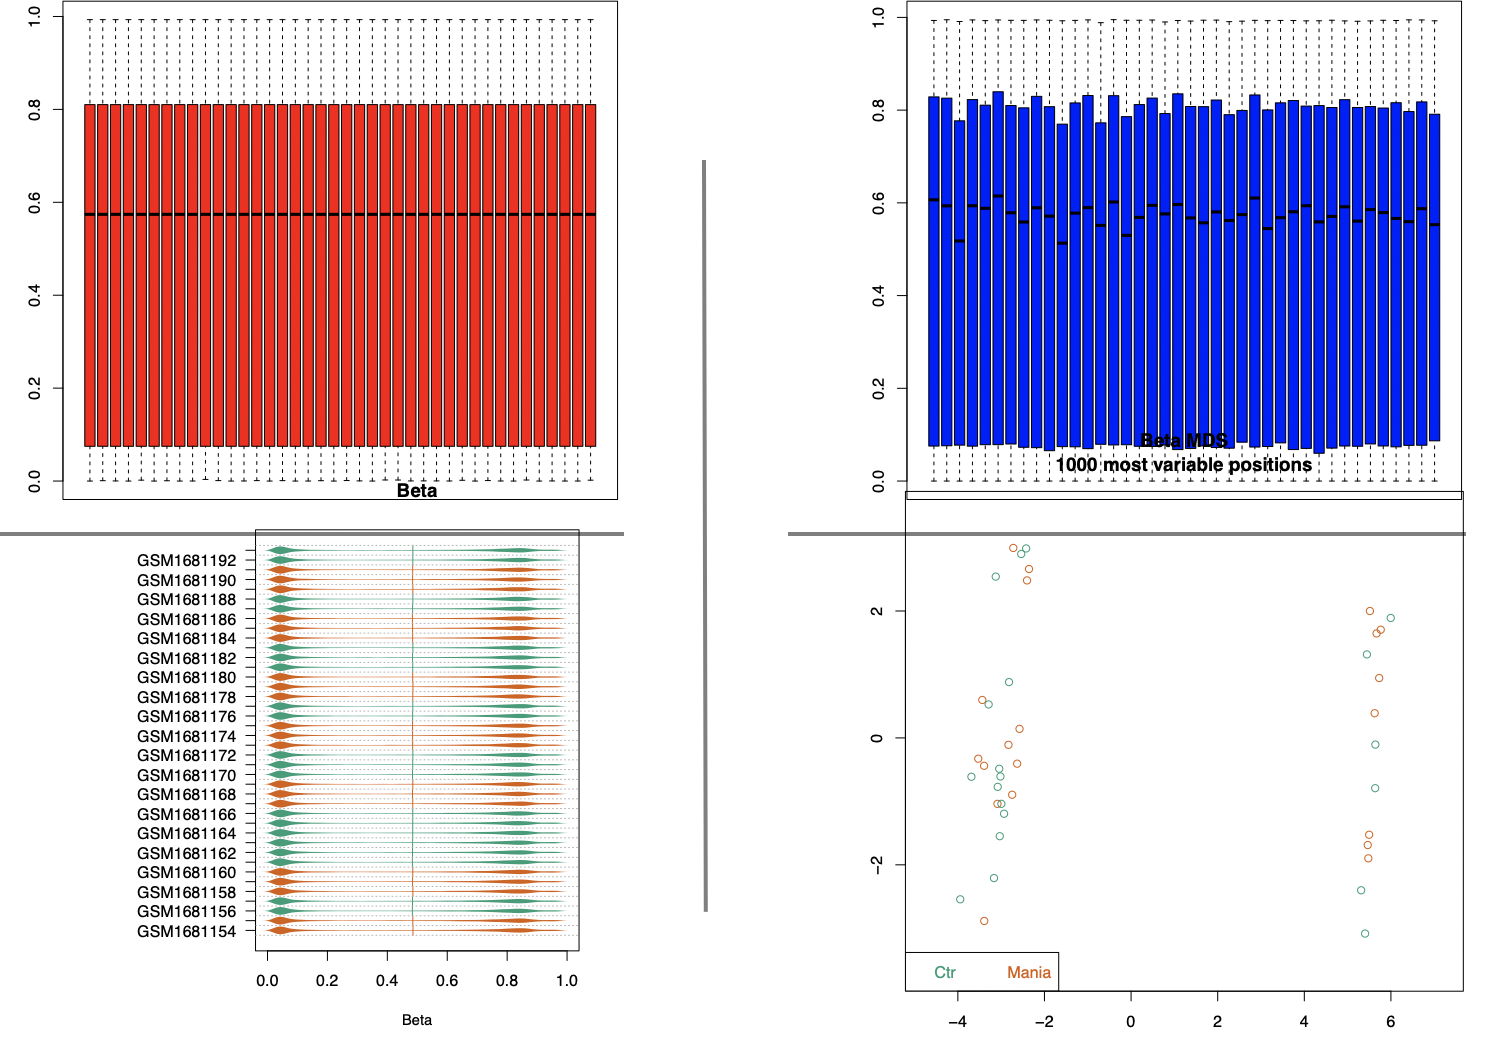
上面代码的4张图,仅仅是展现了wateRmelon进行归一化前后表达量的均一性,那个mds图,就是pca图的类似,也能说明这个项目的分组并不是数据最大的差异,好奇怪哦。

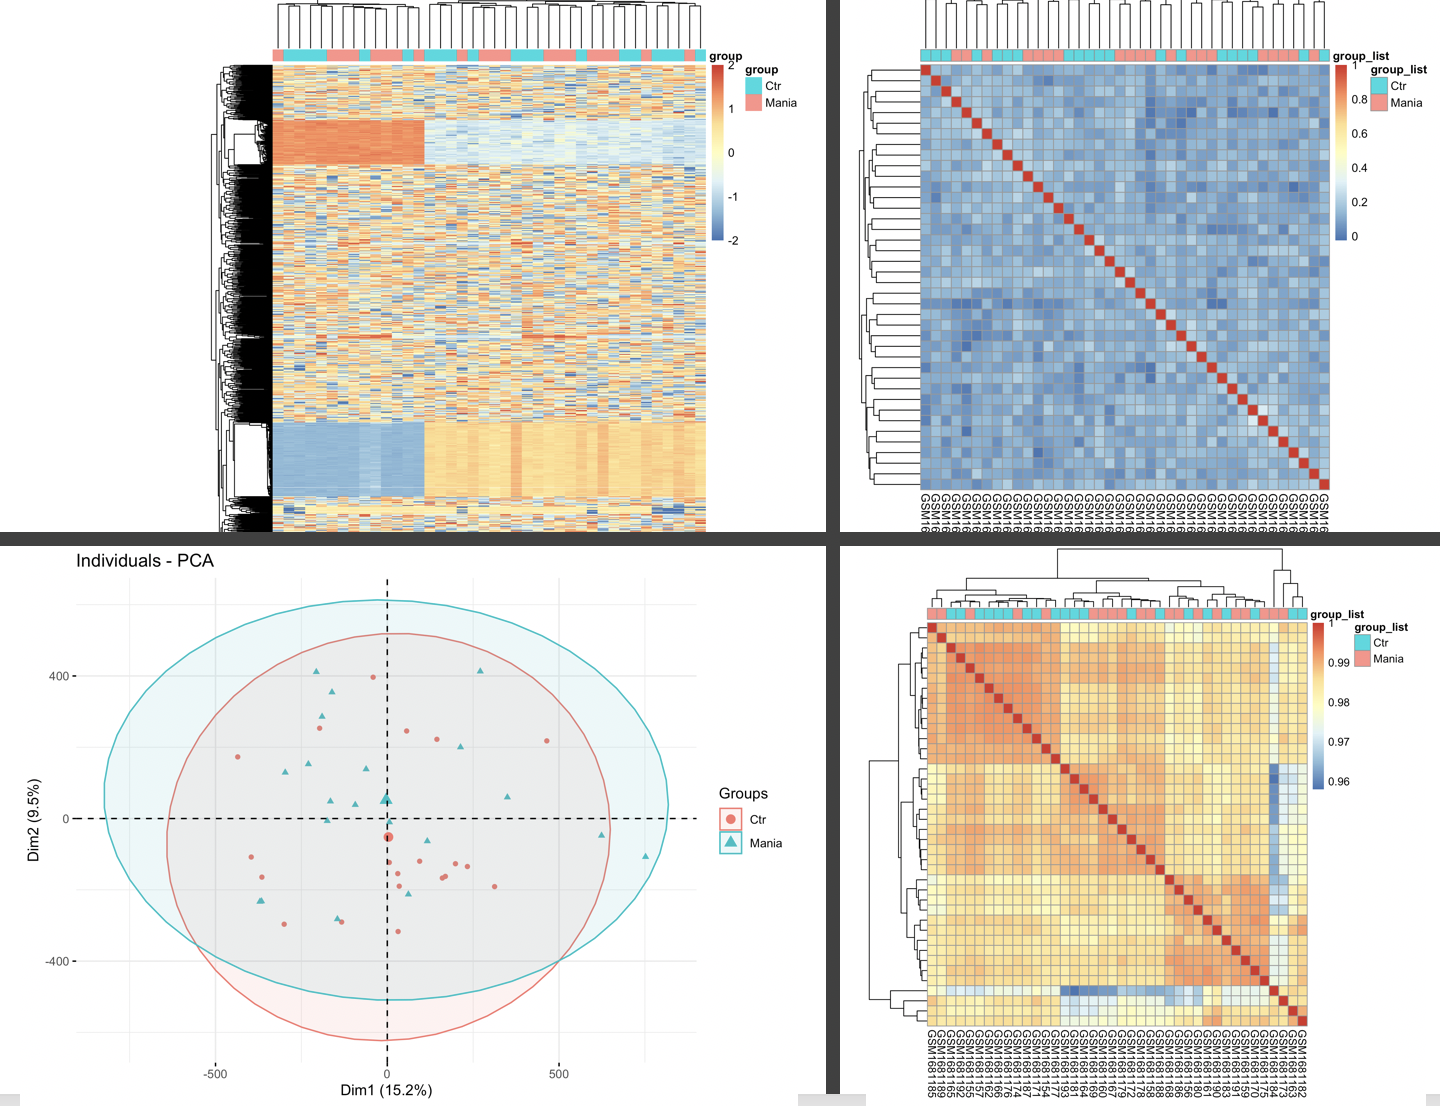
然后看看我们生信技能树独创的表达矩阵标准3张图,其中pca图类似于上面的mds图哈,具体统计学原理我这里略过。
group_list=pD$group
if(T){

dat=t(beta.m)
 dat[1:4,1:4]
 library("FactoMineR")#画主成分分析图需要加载这两个包
 library("factoextra")
 # 因为甲基化芯片是450K或者850K,几十万行的甲基化位点,所以PCA不会太快
 dat.pca <- PCA(dat , graph = FALSE)
 fviz_pca_ind(dat.pca,
 geom.ind = "point", # show points only (nbut not "text")
 col.ind = group_list, # color by groups
 # palette = c("#00AFBB", "#E7B800"),
 addEllipses = TRUE, # Concentration ellipses
 legend.title = "Groups"
 )
 ggsave('all_samples_PCA.png')

 dat=beta.m
 dat[1:4,1:4]
 cg=names(tail(sort(apply(dat,1,sd)),1000))#apply按行('1'是按行取,'2'是按列取)取每一行的方差,从小到大排序,取最大的1000个
 library(pheatmap)
 pheatmap(dat[cg,],show_colnames =F,show_rownames = F) #对那些提取出来的1000个基因所在的每一行取出,组合起来为一个新的表达矩阵
 n=t(scale(t(dat[cg,]))) # 'scale'可以对log-ratio数值进行归一化
 n[n>2]=2
 n[n< -2]= -2
 n[1:4,1:4]
 pheatmap(n,show_colnames =F,show_rownames = F)
 ac=data.frame(group=group_list)
 rownames(ac)=colnames(n)
 pheatmap(n,show_colnames =F,show_rownames = F,
 annotation_col=ac,filename = 'heatmap_top1000_sd.png')
 dev.off()

 exprSet=beta.m
 pheatmap::pheatmap(cor(exprSet))
 # 组内的样本的相似性应该是要高于组间的!
 colD=data.frame(group_list=group_list)
 rownames(colD)=colnames(exprSet)
 pheatmap::pheatmap(cor(exprSet),
 annotation_col = colD,
 show_rownames = F,
 filename = 'cor_all.png')
 dev.off()
 exprSet=exprSet[names(sort(apply(exprSet, 1,mad),decreasing = T)[1:500]),]
 dim(exprSet)
 # M=cor(log2(exprSet+1))
 M=cor(exprSet)
 pheatmap::pheatmap(M,annotation_col = colD)
 pheatmap::pheatmap(M,
 show_rownames = F,
 annotation_col = colD,
 filename = 'cor_top500.png')
 dev.off()

}
因为这个甲基化芯片的信号值矩阵问题,我们的图如下:

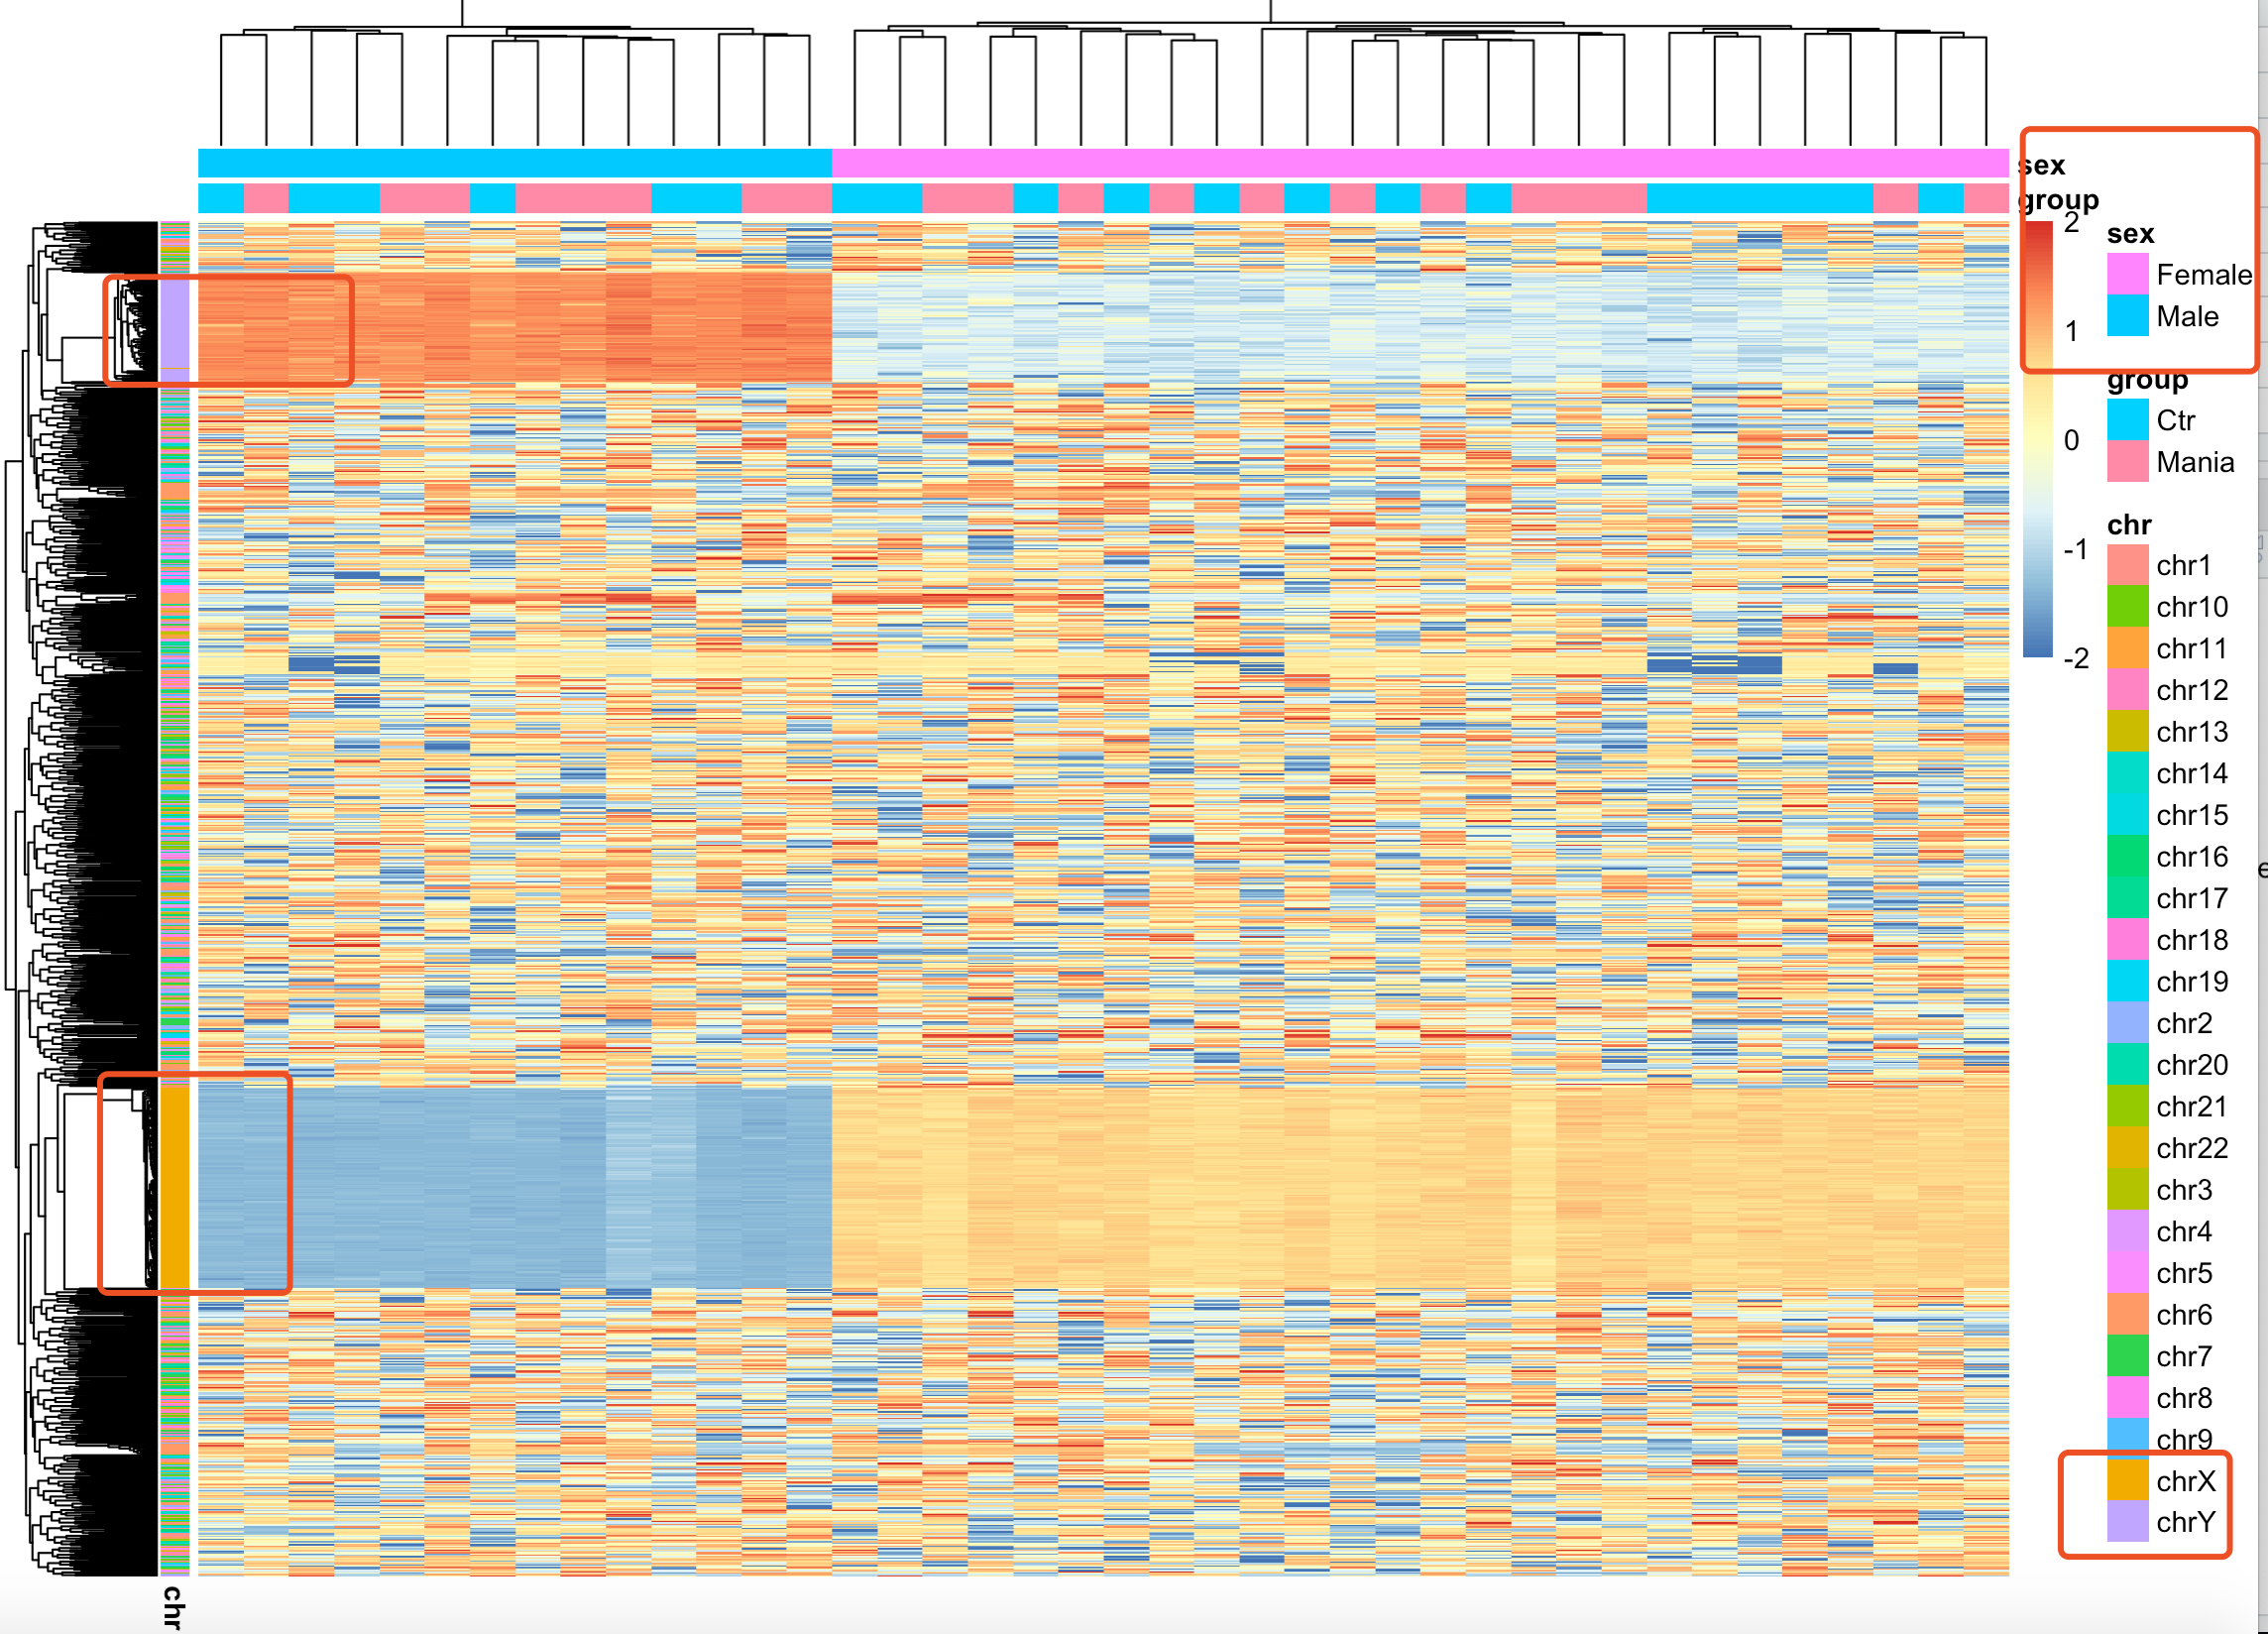
如果你多做一点项目,就会有自己的认知啦。之所以你拿450K全部芯片来做PCA,热图,都是生物学分组不明显,因为性别差异,在甲基化芯片效应非常明显,如下图:

可以很明显的看到,top1000的sd的甲基化探针,主要是在性染色体上面差异巨大!
但是呢,你有没有觉得很烦躁,每次都有做这么多图,最后其实也用不上,仅仅是自己看看罢了。
如果是minfi的对象
同样是进行一系列质控,可以把450K芯片过滤到420K左右:
detP <- detectionP(rgSet)
head(detP)
mSetSq <- preprocessQuantile(rgSet)
detP <- detP[match(featureNames(mSetSq),rownames(detP)),]
keep <- rowSums(detP < 0.01) == ncol(mSetSq)
table(keep)
# 可以看到,这个步骤过滤的探针很有限
mSetSqFlt <- mSetSq[keep,]
mSetSqFlt
# 继续过滤性别相关探针,非常重要
ann450k <- getAnnotation(IlluminaHumanMethylation450kanno.ilmn12.hg19)
head(ann450k)
keep <- !(featureNames(mSetSqFlt) %in% ann450k$Name[ann450k$chr %in%
 c("chrX","chrY")])
table(keep)
mSetSqFlt <- mSetSqFlt[keep,]

# remove probes with SNPs at CpG site
mSetSqFlt <- dropLociWithSnps(mSetSqFlt)
mSetSqFlt
# BiocManager::install("methylationArrayAnalysis",ask = F,update = F)
dataDirectory <- system.file("extdata", package = "methylationArrayAnalysis")
# list the files
# exclude cross reactive probes
xReactiveProbes <- read.csv(file=paste(dataDirectory,
 "48639-non-specific-probes-Illumina450k.csv",
 sep="/"), stringsAsFactors=FALSE)
keep <- !(featureNames(mSetSqFlt) %in% xReactiveProbes$TargetID)
table(keep)

mSetSqFlt <- mSetSqFlt[keep,]
mSetSqFlt
# 全部过滤完成后,还剩下420K的甲基化位点

load(file = 'GSE68777_geoquery_pd.Rdata')
head(pD)
group_list=pD$group
qcReport(rgSet, sampGroups=group_list,
 pdf="minifi_raw_qcReport.pdf")

save(mSetSqFlt,file = 'GSE68777_minfi_mSetSqFlt.Rdata')
# calculate M-values for statistical analysis
mVals <- getM(mSetSqFlt)
head(mVals[,1:5])
bVals <- getBeta(mSetSqFlt)
head(bVals[,1:5])
同样的,有了甲基化信号值矩阵后,就可以走我们的标准3张图。
如果是champ的对象
主要是参考:http://www.bioconductor.org/packages/release/bioc/vignettes/ChAMP/inst/doc/ChAMP.html
进行一系列质控即可,值得注意的是,champ在读取idat芯片原始文件的时候,默认就做了6个步骤的过滤,如下:
- First filter is for probes with detection p-value (default > 0.01).
- Second, ChAMP will filter out probes with <3 beads in at least 5% of samples per probe.
- Third, ChAMP will by default filter out all non-CpG probes contained in your dataset.
- Fourth, by default ChAMP will filter all SNP-related probes.
- Fifth, by default setting, ChAMP will filter all multi-hit probes.
- Sixth, ChAMP will filter out all probes located in chromosome X and Y.
所以,通常一个450K的芯片,加载到R里面就只有400K位点啦。可以拿到过滤后的信号值矩阵自己走我们标准的3张图质控策略,也可以使用champ自带的质控函数。
champ.norm 提供了四种方法:BMIQ, SWAN1, PBC2 and FunctionalNormliazation。默认的方法是BMIQ, 且BMIQ对850K的标准化方法更好一点!
代码异常简单:
load('GSE68777_champ_load.Rdata')
myLoad$pd
champ.QC() ## 输出qc的图表
myNorm <- champ.norm(beta=myLoad$beta,arraytype="450K",cores=5)
dim(myNorm)

# 原来的450K经过质控过滤后是400K啦
beta.m=myNorm
dim(beta.m)
group_list=pD$group
同样的,有了甲基化信号值矩阵后,就可以走我们的标准3张图。
如果是TCGA数据库下载的甲基化信号值矩阵
其实跟从GEO数据库下载甲基化信号值矩阵文件没什么区别哈,通常也推荐使用 ChAMP 流程咯。
A significant improvement for ChAMP is that users can also conduct full analysis even if they are not starting from raw .idat files. As long as you have a methylation beta matrix and the corresponding phenotypes (pd) file, you can conduct nearly all of the ChAMP analysis. This makes analysis easier for users who have beta-values only but not original idat files, for example if users obtain data from TCGA or GEO.
强烈建议你使用ChAMP 流程的测试例子,几行代码就搞定甲基化芯片数据分析全部环节。
data(EPICSimData)
CpG.GUI(arraytype="EPIC")
champ.QC() # Alternatively QC.GUI(arraytype="EPIC")
myNorm <- champ.norm(arraytype="EPIC")
champ.SVD()
# If Batch detected, run champ.runCombat() here.This data is not suitable.
myDMP <- champ.DMP(arraytype="EPIC")
DMP.GUI()
myDMR <- champ.DMR()
DMR.GUI()
myDMR <- champ.DMR(arraytype="EPIC")
DMR.GUI(arraytype="EPIC")
myBlock <- champ.Block(arraytype="EPIC")
Block.GUI(arraytype="EPIC") # For this simulation data, not Differential Methylation Block is detected.
myGSEA <- champ.GSEA(arraytype="EPIC")
myEpiMod <- champ.EpiMod(arraytype="EPIC")