我前面写到了生信分析人员如何入门linux和perl,后面还会写R和python的总结,但是在这中间我想插入一个脚本实战指南。其实在我前两篇日志里面也重点提到了学习编程语言最重要的就是实战了,也点出了几个关键词。在实际生物信息学数据处理中应用perl和linux,可以借鉴EMBOSS软件套件,fastx-toolkit等基础软件,实现并且模仿该软件的功能。尤其是SMS2/exonerate/里面的一些常见功能,还有DNA2.0 Bioinformatics Toolbox的一些工具。如果你这些名词不懂,请赶快谷歌!!! 它们做了什么,输入文件是什么,输出文件是什么,你都可以用脚本实现!
Category Archives: perl
生信分析人员如何系统入门perl?
R包精讲第四篇:4种R包安装方式
请先看:R包精讲第一篇:如何查看你已经安装了和可以安装哪些R包?
第一种方式,当然是R自带的函数直接安装包了,这个是最简单的,而且不需要考虑各种包之间的依赖关系。
对普通的R包,直接install.packages()即可,一般下载不了都是包的名字打错了,或者是R的版本不够,如果下载了安装不了,一般是依赖包没弄好,或者你的电脑缺少一些库文件,如果实在是找不到或者下载慢,一般就用repos=来切换一些镜像。
> install.packages("ape") ##直接输入包名字即可 Installing package into ‘C:/Users/jmzeng/Documents/R/win-library/3.1’ (as ‘lib’ is unspecified) ##一般不指定lib,除非你明确知道你的lib是在哪里 trying URL 'http://mirror.bjtu.edu.cn/cran/bin/windows/contrib/3.1/ape_3.4.zip' Content type 'application/zip' length 1418322 bytes (1.4 Mb) opened URL ## 根据你选择的镜像,程序会自动拼接好下载链接url downloaded 1.4 Mb package ‘ape’ successfully unpacked and MD5 sums checked ##表明你已经安装好包啦 The downloaded binary packages are in ##程序自动下载的原始文件一般放在临时目录,会自动删除 C:\Users\jmzeng\AppData\Local\Temp\Rtmpy0OivY\downloaded_packages |
|
|
对于bioconductor的包,我们一般是
source("http://bioconductor.org/biocLite.R") ##安装BiocInstaller
#options(BioC_mirror=”http://mirrors.ustc.edu.cn/bioc/“) 如果需要切换镜像
biocLite("ggbio")或者直接BiocInstaller::biocLite('ggbio') ## 前提是你已经安装好了BiocInstaller
某些时候你还需要卸载remove.packages("BiocInstaller") 然后安装新的
第二种方式,是直接找到包的下载地址,需要进入包的主页
packageurl <- "http://cran.r-project.org/src/contrib/Archive/ggplot2/ggplot2_0.9.1.tar.gz"
packageurl <- "http://cran.r-project.org/src/contrib/Archive/gridExtra/gridExtra_0.9.1.tar.gz"
install.packages(packageurl, repos=NULL, type="source")
#packageurl <- "http://www.bioconductor.org/packages/2.11/bioc/src/contrib/ggbio_1.6.6.tar.gz"
#packageurl <- "http://cran.r-project.org/src/contrib/Archive/ggplot2/ggplot2_1.0.1.tar.gz"
install.packages(packageurl, repos=NULL, type="source")
这样安装的就不需要选择镜像了,也跨越了安装器的版本!
第三种是,先把包下载到本地,然后安装:
download.file("http://bioconductor.org/packages/release/bioc/src/contrib/BiocInstaller_1.20.1.tar.gz","BiocInstaller_1.20.1.tar.gz")
##也可以选择用浏览器下载这个包
install.packages("BiocInstaller_1.20.1.tar.gz", repos = NULL)
## 如果你用的RStudio这样的IDE,那么直接用鼠标就可以操作了
或者用choose.files()来手动交互的选择你把下载的源码BiocInstaller_1.20.1.tar.gz放到了哪里。
这种形式大部分安装都无法成功,因为R包之间的依赖性很强!
第四种是:命令行版本安装
如果是linux版本,命令行从网上自动下载包如下:
sudo su - -c \
"R -e \"install.packages('shiny', repos='https://cran.rstudio.com/')\""
如果是linux,命令行安装本地包,在shell的终端
sudo R CMD INSTALL package.tar.gz
window或者mac平台一般不推荐命令行格式,可视化那么舒心,何必自讨苦吃
用perl把含有简并碱基的引物序列还原成多条序列-更正
感谢读者的指正,我以前写的一个程序是错的,从算法设计上就错了!
http://www.bio-info-trainee.com/926.html
我从新设计了一个算法,经过再三检查,我可以确信它是对的,至于是否高效,就不敢保证了,也希望有更多热心的读者帮助我改正,或者跟我讨论,请直接联系我的邮箱jmzeng1314 at(防爬虫) 163.com
perl程序技巧-检验系统环境或模块安装
这个程序是我在VirusFinder里面发现的,大家可以自行搜索它!
非常好用,建议大家写程序都可以加上这个!
print "\nChecking Java version...\n\n";my $ret = `java -version 2>&1`;print "$ret\n";if (index($ret, '1.6') == -1) {printf "Warning: The tool Trinity of the Broad Institute may require Java 1.6.\n\n";}print "\nChecking SAMtools...\n\n";$ret = `which samtools 2>&1`;if (index($ret, 'no samtools') == -1) {printf "%-30s\tOK\n\n", 'SAMtools';}else{printf "%-30s\tnot found\n\n", 'SAMtools';}my @required_modules = ("Bio::DB::Sam","Bio::DB::Sam::Constants","Bio::SeqIO","Bio::SearchIO","Carp","Config::General","Cwd","Data::Dumper","English","File::Basename","File::Copy","File::Path","File::Spec","File::Temp","FindBin","Getopt::Std","Getopt::Long","IO::Handle","List::MoreUtils","Pod::Usage","threads");print "\nChecking CPAN modules required by VirusFinder...\n\n";my $count = 0;for my $module (@required_modules){eval("use $module");if ($@) {printf "%-30s\tFailed\n", $module;$count++;}else {printf "%-30s\tOK\n", $module;}}if ($count==1){print "\n\nOne module may not be installed properly.\n\n";}elsif ($count > 1){print "\n\n$count modules may not be installed properly.\n\n";}else{print "\n\nAll CPAN modules checked!\n\n";}
perl模块终极解决方案-下
其实可以手动下载local::lib, 这个perl模块,然后自己安装在指定目录,也是能解决模块的问题!
下载之后解压,进入:
 $ perl Makefile.PL --bootstrap=~/.perl  ##这里设置你想把模块放置的目录
 $ make test && make install
 $ echo 'eval $(perl -I$HOME/.perl/lib/perl5 -Mlocal::lib=$HOME/.perl)' >> ~/.bashrc
等待几个小时即可!!!
添加好环境变量之后,就可以用
perl -MCPAN -Mlocal::lib -e 'CPAN::install(LWP)'
其实你也可以直接打开 ~/.bashrc,然后写入下面的内容
PERL5LIB=$PERL5LIB:/PATH_WHERE_YOU_PUT_THE_PACKAGE/source/bin/perl_module; export PERL5LIB
可以把perl模块安装在任何地方,然后通过这种方式去把模块加载到你的perl程序!
perl模块终极解决方案-上
不管别人怎么说,反正我是非常喜欢perl语言的!
也会继续学习,以前写过不少perl模块的博客,发现有点乱,正好最近看到了关于local::lib这个模块。
居然是用来解决没有root权限的用户安装,perl模块问题的!
首先说一下,如果是root用户,模块其实没有问题,直接用cpan下载器,几乎能解决所有的模块下载安装问题!
但是如果是非root用户,那么就麻烦了,很难用自动的cpan下载器,这样只能下载模块源码,然后编译,但是编译有个问题,很多模块居然是依赖于其它模块的,你的不停地下载其它依赖模块,最后才能解决,特别麻烦
但是,只需要运行下面的代码:
wget -O- http://cpanmin.us | perl - -l ~/perl5 App::cpanminus local::lib
eval `perl -I ~/perl5/lib/perl5 -Mlocal::lib`
echo 'eval `perl -I ~/perl5/lib/perl5 -Mlocal::lib`' >> ~/.profile
echo 'export MANPATH=$HOME/perl5/man:$MANPATH' >> ~/.profile
就能拥有一个私人的cpan下载器,~/.profile可能需要更改为.bash_profile, .bashrc, etc等等,取决于你的linux系统!
然后你直接运行cpanm Module::Name,就跟root用户一样的可以下载模块啦!
或者用下面的方式在shell里面安装模块,其中ext是模块的安装目录,可以修改
perl -MTime::HiRes -e 1 > /dev/null 2>&1 || cpanm -v --notest -l ext Time::HiRes;
perl -MFile::Path -e 1 > /dev/null 2>&1 || cpanm -v --notest -l ext File::Path;
perl -MFile::Basename -e 1 > /dev/null 2>&1 || cpanm -v --notest -l ext File::Basename;
perl -MFile::Copy -e 1 > /dev/null 2>&1 || cpanm -v --notest -l ext File::Copy;
perl -MIO::Handle -e 1 > /dev/null 2>&1 || cpanm -v --notest -l ext IO::Handle;
perl -MYAML::XS -e 1 > /dev/null 2>&1 || cpanm -v --notest -l ext YAML::XS;
perl -MYAML -e 1 > /dev/null 2>&1 || cpanm -v --notest -l ext YAML;
perl -MXML::Simple -e 1 > /dev/null 2>&1 || cpanm -v --notest -l ext XML::Simple;
perl -MStorable -e 1 > /dev/null 2>&1 || cpanm -v --notest -l ext Storable;
perl -MStatistics::Descriptive -e 1 > /dev/null 2>&1 || cpanm -v --notest -l ext Statistics::Descriptive;
perl -MTie::IxHash -e 1 > /dev/null 2>&1 || cpanm -v --notest -l ext Tie::IxHash;
perl -MAlgorithm::Combinatorics -e 1 > /dev/null 2>&1 || cpanm -v --notest -l ext Algorithm::Combinatorics;
perl -MDevel::Size -e 1 > /dev/null 2>&1 || cpanm -v --notest -l ext Devel::Size;
perl -MSort::Key::Radix -e 1 > /dev/null 2>&1 || cpanm -v --notest -l ext Sort::Key::Radix;
perl -MSort::Key -e 1 > /dev/null 2>&1 || cpanm -v --notest -l ext Sort::Key;
perl -MBit::Vector -e 1 > /dev/null 2>&1 || cpanm -v --notest -l ext Bit::Vector;
perl -M"feature 'switch'" -e 1 > /dev/null 2>&1 || cpanm -v --notest -l ext feature;
下面是解释为什么这样可以解决问题!!!
What follows is a brief explanation of what the commands above do.
wget -O- http://cpanmin.us fetches the latest version of cpanm and prints it to STDOUT which is then piped to perl - -l ~/perl5 App::cpanminus local::lib. The first - tells perl to expect the program to come in on STDIN, this makes perl run the version of cpanm we just downloaded.perl passes the rest of the arguments to cpanm. The -l ~/perl5 argument tells cpanm where to install Perl modules, and the other two arguments are two modules to install. [App::cpanmins]1 is the package that installs cpanm. local::lib is a helper module that manages the environment variables needed to run modules in local directory.
After those modules are installed we run
eval `perl -I ~/perl5/lib/perl5 -Mlocal::lib`to set the environment variables needed to use the local modules and then
echo 'eval `perl -I ~/perl5/lib/perl5 -Mlocal::lib`' >> ~/.profileto ensure we will be able to use them the next time we log in.
echo 'export MANPATH=$HOME/perl5/man:$MANPATH' >> ~/.profilewill hopefully cause man to find the man pages for your local modules.
这种类似的问题被问的特别多!
There's the way documented in perlfaq8, which is what local::lib is doing for you.
It's also a frequently asked StackOverflow question:
- Why does installing certain CPAN modules require root privilege?
- How can I install CPAN modules locally without root access (DynaLoader.pm line 229 error)?
- How do I tell CPAN.pm to install all modules in a specific directory?
- How can I install a CPAN module into a local directory?
- How can I use a new Perl module without install permissions?
- How can I use CPAN as a non-root user?
- How can I install local modules with the cpan tool?
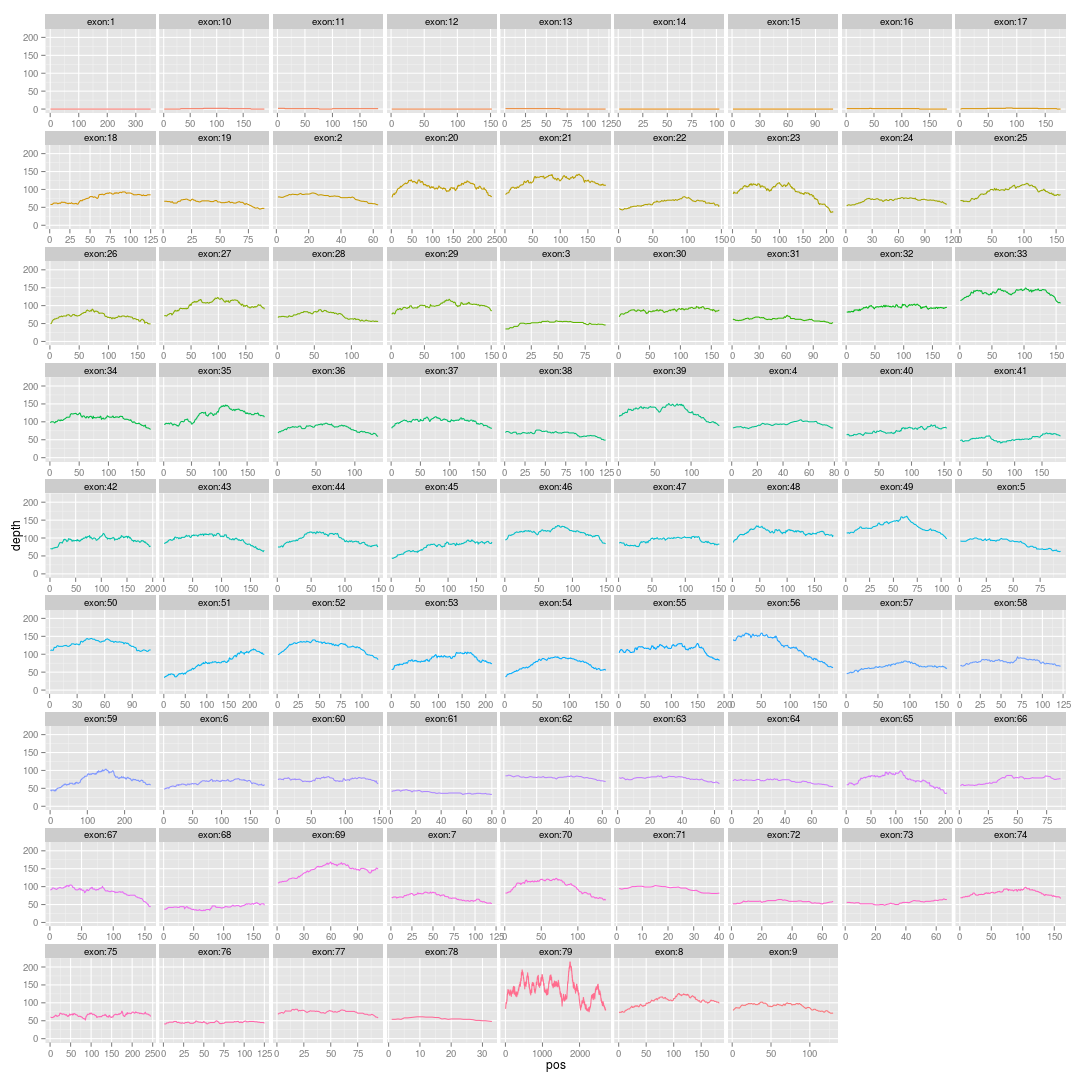
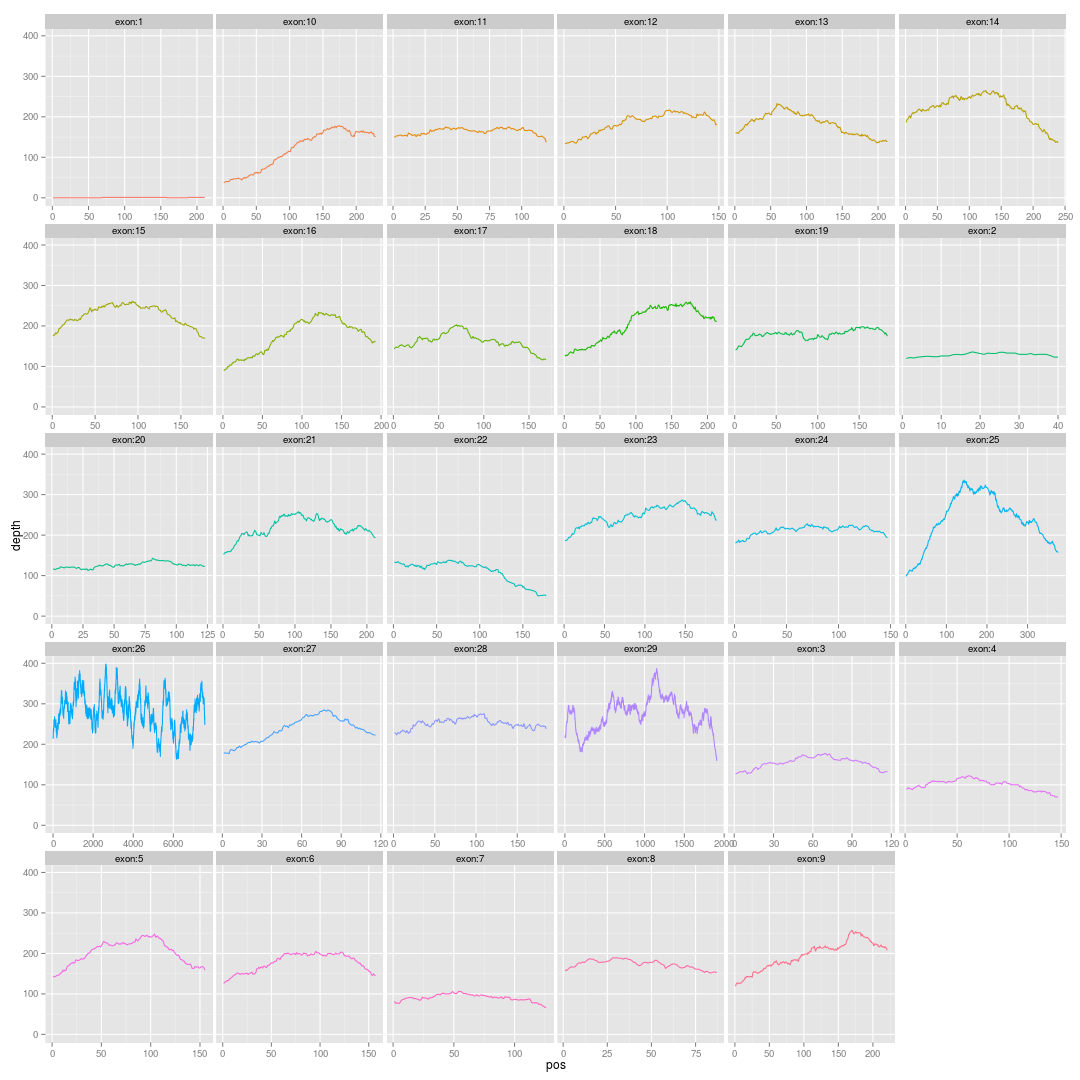
画基因的外显子覆盖度图
perl的模块组织方式
如何使用自己写的私人模块
/www/modules/MyMods/Foo.pm
/www/modules/MyMods/Bar.pm
And then where I use them:
use lib qw(/www/modules);useMyMods::Foo; useMyMods::Bar;
As reported by "perldoc -f use":
It is exactly equivalent to
BEGIN { require Module; import Module LIST; }
except that Module must be a bareword.
Putting that another way, "use" is equivalent to:
- running at compile time,
- converting the package name to a file name,
require-ing that file name, andimport-ing that package.
So, instead of calling use, you can call require and import inside a BEGIN block:
BEGIN{require'../EPMS.pm';
  EPMS->import();}
And of course, if your module don't actually do any symbol exporting or other initialization when you call import, you can leave that line out:
BEGIN{require'../EPMS.pm';}一个基因坐标定位到具体基因的程序的改进
这是为了回答以前的一个疑问:任意给定基因组的 chr:pos, 判断它在哪个基因上面?这个程序难吗?
基因的chr,start,end都是已知的
学术一点讲述这个问题:已知CNV数据在染色体上的position如chr1:2075000-2930999,怎样批量获取其对应的Gene Symbol呢(批量)
数据如下:
head gene_position.hg19 //共21629行
1 chr19 58858171 58874214 A1BG ENSG00000121410
2 chr12 9220303 9268558 A2M ENSG00000175899
3 chr12 9381128 9386803 A2MP1 ENSG00000256069
9 chr8 18027970 18081198 NAT1 ENSG00000171428
10 chr8 18248754 18258723 NAT2 ENSG00000156006
12 chr14 95058394 95090390 ENSG00000273259
13 chr3 151531860 151546276 AADAC ENSG00000114771
14 chr2 219128851 219134893 AAMP ENSG00000127837
15 chr17 74449432 74466199 AANAT ENSG00000129673
16 chr16 70286296 70323412 AARS ENSG00000090861
head pfam.df.hg19.bed //共340960行
chr1 12190 12689 Helicase_C_2 0 + 12190 12689 255,255,0
chr1 69157 69220 7tm_4 0 + 69157 69220 255,255,0
chr1 69184 69817 7TM_GPCR_Srsx 0 + 69184 69817 255,255,0
chr1 69190 69931 7tm_1 0 + 69190 69931 255,255,0
chr1 69490 69910 7tm_4 0 + 69490 69910 255,255,0
现在需要对我们的pfam数据进行注释,根据每一行的chr和pos来看看是属于哪一个基因
总共会有338879 条pfam记录可以注释上基因。
注释之后应该是 head pfam.gene.df.hg19 这个样子
CDK11B chr1 1571423 1573930 Pkinase 0 - 1571423 1573930 255,255,0
CDK11B chr1 1572048 1573921 Pkinase_Tyr 0 - 1572048 1573921 255,255,0
CDK11B chr1 1572120 1572823 Kinase-like 0 - 1572120 1572823 255,255,0
CDK11B chr1 1572120 1572820 Kinase-like 0 - 1572120 1572820 255,255,0
CDK11B chr1 1572120 1572817 Kinase-like 0 - 1572120 1572817 255,255,0
CDK11B chr1 1573173 1573918 Kinase-like 0 - 1573173 1573918 255,255,0
CDK11B chr1 1575747 1577317 Daxx 0 - 1575747 1577317 255,255,0
CDK11B chr1 1576417 1577347 Nop14 0 - 1576417 1577347 255,255,0
CDK11B chr1 1576423 1577332 Mitofilin 0 - 1576423 1577332 255,255,0
CDK11B chr1 1576432 1577317 SAPS 0 - 1576432 1577317 255,255,0
我的第一个程序用的是全基因位点扫描到hash的方法。这样需要扫描13,1390,4974个位点,多于三分之一的基因组,这样是非常浪费内存的,尤其是keys需要多个字节。
我用了256G的服务器都没有运行完。
后来我取巧了把我的gene_position.hg19文件用split命令分成了25个,然后循环25次对pfam.df.hg19.bed 文件进行注释。
这样的确可以解决问了,而且只需要32G的内存的服务器即可,时间也很快,就十多分钟吧。
但这只是取巧的方法,应该要从算法上面优化,首先我仅仅做一个改动,就是不再扫描全基因的位点,对每个基因,我以1K的窗口来取位点进行扫描。这样我判断pfam的坐标时候,也以1K为最小单位进行判断。
这样只需要不到30s就可以出结果,总共注释了303474条pfam记录,还不是最终的338879,因为我这次只注释了基因的1000整数倍基因区间,这样如果pfam记录落在一个基因的起始终止点不到1K位置时就不会被注释。这时候需要对代码进行继续优化。
脚步懒得上传了,在我的有道云笔记里面。
http://note.youdao.com/share/?id=58e66d138e9434284ffa61c53b65abdc&type=note
用perl把含有简并碱基的引物序列还原成多条序列
这篇博客的程序是错的,请看我最新博客:http://www.bio-info-trainee.com/1528.html
简并碱基对应表格如下;
R:ag
Y:CT
M:AC
K:GT
S:gc
W:AT
H:atc
B:gtc
V:gac
D:GAT
N:ATgc
把这个文本拷贝到txt文件里面保存好,或者直接写入hash里面也行!
[perl]
open FH,"ATCG.txt";
while(<FH>){
chomp;
@F=split/:/;
$hash{$F[0]}=uc $F[1];#右边就是简并表格
}
open FH1,"primer.txt";
while(<FH1>){
next if />/;
chomp;
primer2multiple($_); #对每个含有简并碱基的引物都进行以下函数处理
}
sub primer2multiple{
$primer=$_[0];
$prod=1;
$primer_len=length $primer ;
foreach $i (0..$primer_len-1){
$char=substr($primer,$i,1);
if ($char !~/[ATCG]/){$prod*=length $hash{$char}}
}
$new="";
foreach $i (0..$primer_len-1){
$char=substr($primer,$i,1);
if ($char =~/[ATCG]/){$new.=$char x $prod}
else {$tmp=length $hash{$char};$new.=$hash{$char} x ($prod/$tmp)}
}
die "error!" if $primer_len*$prod != length $new ;
foreach $i (0..$prod-1){
$tmp="";
for(my $j=$i;$j<(length($new));$j+=$prod){$tmp.=substr($new,$j,1)}
print "$tmp\n";
}
}
[/perl]
可以直接调用这个函数即可primer2multiple('ATGCVHGT');
就可以看到简并碱基被替换啦,就是那个V和H
ATGCGAGT
ATGCATGT
ATGCCCGT
ATGCGAGT
ATGCATGT
ATGCCCGT
ATGCGAGT
ATGCATGT
ATGCCCGT
perl用递归法得到允许多个错配的模式匹配
如果我要匹配一个字符串$a="ATTCCGGGAT";那么直接在shell里面grep它即可,写脚本也行$seq =~ /$a/;,但是如果我想查找这个字符串的模糊匹配,允许一个错配的情况,那么就非常多了!这时候简单的匹配已经不能达到目的,但是我们仍然可以用perl强大的正则匹配功能达到目的。
比如,它的匹配模式应该:
/.TTCCGGGAT/
/A.TCCGGGAT/
/AT.CCGGGAT/等等,可以把这些模式都综合起来就是下面这个
$b=(?^:(?:A(?:T(?:T(?:C(?:C(?:G(?:G(?:G(?:A.|.T)|.AT)|.GAT)|.GGAT)|.GGGAT)|.CGGGAT)|.CCGGGAT)|.TCCGGGAT)|.TTCCGGGAT))
所以我们就应该通过程序来生成这个字符串,然后用
$seq =~ /$b/;来替代$seq =~ /$a/;
而允许两个错配的格式就更复杂了:
(?^:(?:A(?:T(?:T(?:C(?:C(?:G(?:G(?:G..|.(?:A.|.T))|.(?:G(?:A.|.T)|.AT))|.(?:G(?:G(?:A.|.T)|.AT)|.GAT))|.(?:G(?:G(?:G(?:A.|.T)|.AT)|.GAT)|.GGAT))|.(?:C(?:G(?:G(?:G(?:A.|.T)|.AT)|.GAT)|.GGAT)|.GGGAT))|.(?:C(?:C(?:G(?:G(?:G(?:A.|.T)|.AT)|.GAT)|.GGAT)|.GGGAT)|.CGGGAT))|.(?:T(?:C(?:C(?:G(?:G(?:G(?:A.|.T)|.AT)|.GAT)|.GGAT)|.GGGAT)|.CGGGAT)|.CCGGGAT))|.(?:T(?:T(?:C(?:C(?:G(?:G(?:G(?:A.|.T)|.AT)|.GAT)|.GGAT)|.GGGAT)|.CGGGAT)|.CCGGGAT)|.TCCGGGAT)))
[perl]
$a="ATTCCGGGAT";
$one_match=fuzzy_pattern($a,1);
print "$one_match\n";
sub fuzzy_pattern {
my ($original_pattern, $mismatches_allowed) = @_;
$mismatches_allowed >= 0
or die "Number of mismatches must be greater than or equal to zero\n";
my $new_pattern = make_approximate($original_pattern, $mismatches_allowed);
return qr/$new_pattern/;
}
sub make_approximate {
my ($pattern, $mismatches_allowed) = @_;
if ($mismatches_allowed == 0) { return $pattern }
elsif (length($pattern) <= $mismatches_allowed)
{ $pattern =~ tr/ACTG/./; return $pattern }
else {
my ($first, $rest) = $pattern =~ /^(.)(.*)/;
my $after_match = make_approximate($rest, $mismatches_allowed);
if ($first =~ /[ACGT]/) {
my $after_miss = make_approximate($rest, $mismatches_allowed-1);
return "(?:$first$after_match|.$after_miss)";
}
else { return "$first$after_match" }
}
}
[/perl]
只需要控制$one_match=fuzzy_pattern($a,1);里面的参数即可控制自己想要的匹配情况。
然后把生成的匹配模式用了进行序列匹配$seq =~ /$one_mismatch/;
这个程序的重点就是解析需要生成的匹配字符串规则,然后用递归来生成这个匹配字符串。
这种匹配,在引物搜索特别有用。
perl多重循环生成全排列精简
我想输出ATCG四个字符,组成一个12个字符长度字符串的全排列。共4^12=16777216种排列,
AAAAAAAAAAAA
AAAAAAAAAAAT
AAAAAAAAAAAC
AAAAAAAAAAAG
AAAAAAAAAATA
`````````````````````````
按照正常的想法是通过多重循环来生成全排列,所以我写下了下面这样的代码,但是有个问题,它不支持多扩展性,如果100个全排列,那么得写一百次循环嵌套。
所以我求助了perl-china群里的高手,其中一个给了一个结合二进制的巧妙解决方案。
perl -le '{$a{"00"}="A";$a{"01"}="T";$a{"10"}="C";$a{"11"}="G";for(0..100){print join"",map{$a{$_}} unpack("a2"x12,sprintf("%024b\n",$_))}}'
AAAAAAAAAAAA
AAAAAAAAAAAT
AAAAAAAAAAAC
AAAAAAAAAAAG
AAAAAAAAAATA
AAAAAAAAAATT
AAAAAAAAAATC
AAAAAAAAAATG
AAAAAAAAAACA
AAAAAAAAAACT
AAAAAAAAAACC
AAAAAAAAAACG
AAAAAAAAAAGA
AAAAAAAAAAGT
AAAAAAAAAAGC
AAAAAAAAAAGG
AAAAAAAAATAA
AAAAAAAAATAT
这里我简单解释一下这个代码
perl -le '{$a=sprintf("%024b\n",1);print $a}'
000000000000000000000001
这个sprintf是根据024b的格式把我们的十进制数字转为二级制,但是补全为24位。
perl -le '{@a=unpack("a2"x12,sprintf("%024b\n",100));print join":", @a}'
00:00:00:00:00:00:00:00:01:10:01:00
unpack这个函数很简单,就是把二进制的数值拆分成字符串数组,两个数字组成一个字符串。
最后通过map把$a{"00"}="A";$a{"01"}="T";$a{"10"}="C";$a{"11"}="G";对应成hash值并且输出即可!
然后这个大神又提成了一个递归的办法来解决
[perl]
#!/usr/bin/perl
my $arr = [];
$arr->[$_] = 0 for (0..11);
my @b = ("A","C","G","T");
while(1){
print join "", map {$b[$_]} @$arr;
print "\n";
exit unless &count($arr,11);
}
sub count {
my $arr = shift;
my $x = shift;
return 0 if $x < 0;
if ($arr->[$x] < 3){
$arr->[$x]++;
return 1;
}
else{
$arr->[$x] = 0;
return &count($arr,$x - 1);
}
}
[/perl]
还有另外一个大神也提成了一个递归的算法解决,算法之道还是蛮有趣的
最后还补充一个也是计算机技巧的解决方案,也是群里的朋友提出来的。
[perl]
#!/usr/bin/perl -w
my @A = qw(A T G C);
my $N = 12;
foreach my $n (0..4**$N){
foreach my $index (0..$N){
print $A[$n%4];
$n = $n >>2;
}
print "\n";
}
[/perl]
这个是位运算,如果C语言基础学的好的同学很快就能看懂的。
perl操作pdf文档
大家看看就好,这个模块写的不怎么样,而且有高手已经写了一个pdftoolkit就是完全用这个模块实现了大部分pdf文档的操作
PDF::API2模块使用笔记
一:简单使用方法
use PDF::API2;
| # Create a blank PDF file | $pdf = PDF::API2->new(); |
| # Open an existing PDF file | $pdf = PDF::API2->open('some.pdf'); |
| # Add a blank page | $page = $pdf->page(); |
| # Retrieve an existing page | $page = $pdf->openpage($page_number); |
| # Set the page size | $page->mediabox('Letter'); |
| # Add a built-in font to the PDF | $font = $pdf->corefont('Helvetica-Bold'); |
| # Add an external TTF font to the PDF | $font = $pdf->ttfont('/path/to/font.ttf'); |
|
# Add some text to the page |
$text = $page->text();
$text->font($font, 20); $text->translate(200, 700); $text->text('Hello World!'); |
| # Save the PDF | $pdf->saveas('/path/to/new.pdf'); |
实例:
use PDF::API2;
$pdf=PDF::API2->new;
$pdf->mediabox('A4');
$ft=$pdf->cjkfont('Song');
$page = $pdf->page;
$gfx=$page->gfx;
$gfx->textlabel(50,750,$ft,20,"\x{Cool44}\x{4EA7}"); # 资产二字
$pdf->saveas('Song_Test.pdf');
二:主要对象及方法
1、pdf对象可以创造,可以打开,可以保存,可以更新,还有一堆参数可以设置
$pdf->preferences(%options)还可以设置一些浏览参数,不过本来pdf阅读器可以设置,没必要在这里花时间。
这个可以当做是个人创建pdf的保密信息,也许有一点用吧。
还可以可以设置页脚$pdf->pageLabel($index, $options
2、Page对象,可以新建,可以打开,可以保存(需要指定保存的位置)
$page = $pdf->page()
$page = $pdf->page($page_number)
$page = $pdf->openpage($page_number);
还可以更新旧的pdf,这样可以循环获取pdf页面不停的累积到一个新的pdf
$page = $pdf->import_page($source_pdf, $source_page_number, $target_page_number)
$pdf = PDF::API2->new();
$old = PDF::API2->open('our/old.pdf'); # Add page 2 from the old PDF as page 1 of the new PDF
$page = $pdf->import_page($old, 2);
$pdf->saveas('our/new.pdf');If $source_page_number is 0 or -1, it will return the last page in the document.
$count = $pdf->pages()Returns the number of pages in the document.
这样就可以写一个简单程序把我们的pdf文件合并
use PDF::API2;
my $new = PDF::API2->new;
foreach my $filename (@ARGV) { my $pdf = PDF::API2->open($filename); $new->importpage($pdf, $_) foreach 1 .. $pdf->pages;}$new->saveas('new.pdf'); $pdf->mediabox($name)
可以指定A4,A3,A5等等$pdf->mediabox($w, $h)可以指定宽度和高度$pdf->mediabox($llx, $lly, $urx, $ury)
3,还可以随意画点线面及表格,太复杂了就不看了
模拟测序lambda_virus基因组
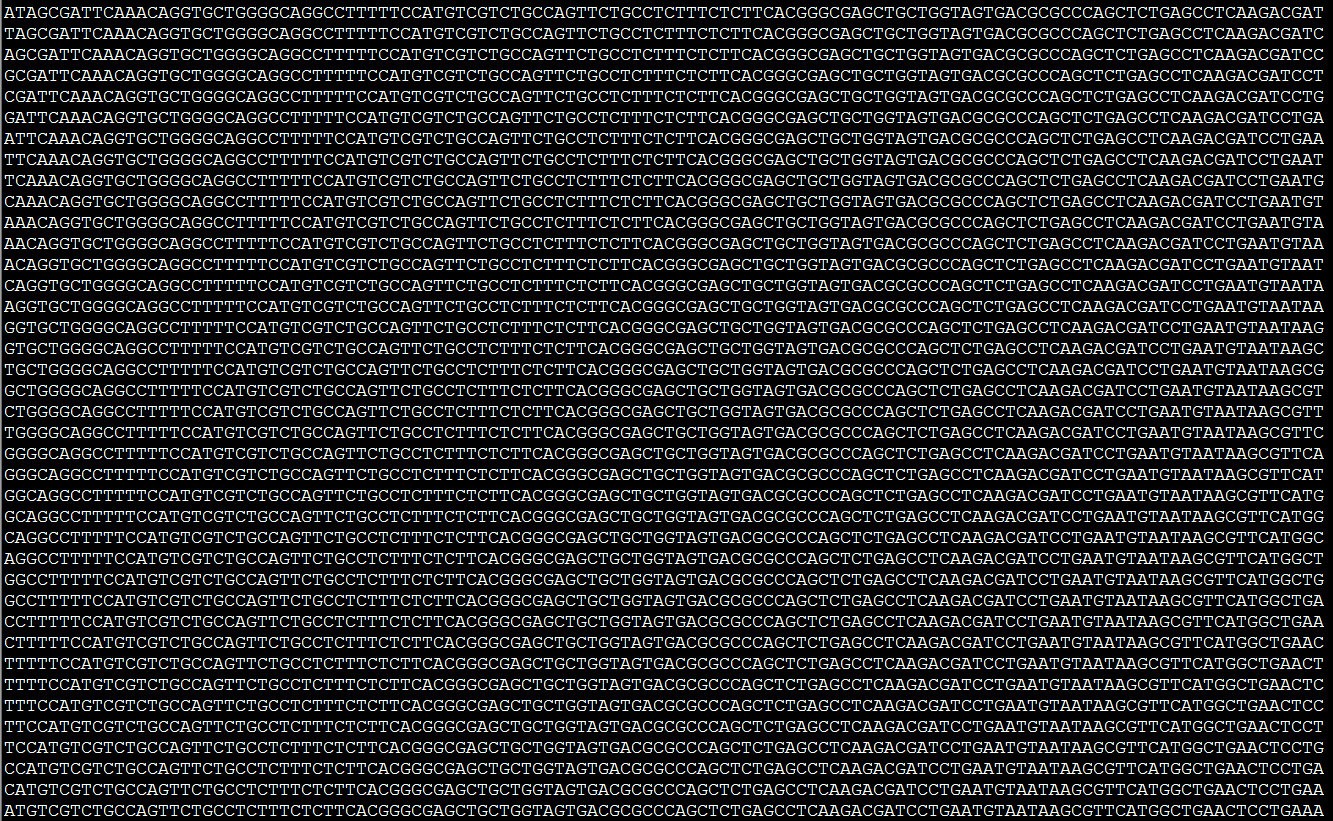
lambda_virus基因组文件是bowtie软件自带的测试数据,共48502个bp,首先我用脚本模拟出它的全打断文件!
perl -alne '{next if /^>/;$a.=$_;}END{$len=length $a;print substr($a.$a,$_,120) foreach 0..$len}' lambda_virus.fa >lamb_virus.120bp
长度均为120bp的片段。
我测序的策略是CTAG碱基重复30次,共加入120个碱基。
对每个120bp片段来说,如果遇到互补碱基就加上,直到120个碱基加完,这样如果比较巧合的话,会有部分碱基能全部加满120bp的,但是如果每个120bp片段的ATCG分布均匀,那么就都应该30bp碱基能被加上。
[perl]
while (<>) {
$seq=$_;$sum=0;
foreach $i (0..120){
$str=substr($seq,$i,2);
if ($str eq "GG"| $str eq "CC"| $str eq "AA"| $str eq "TT"){$sum+=4;}
elsif ($str eq "GT"| $str eq "CG"| $str eq "AC"| $str eq "TA"){$sum+=3;}
elsif ($str eq "GA"|$str eq "CT"| $str eq "AG"| $str eq "TC"){$sum+=2;}
else{$sum+=1;};
#print "$sum\n";
if ($sum>120){print "$i\n";last;}
}
}
[/perl]
perl length.pl lambda_virus.120bp >length.txt
得到结果如下:
| Length | 36 | 37 | 38 | 39 | 40 | 41 | 42 | 43 | 44 | 45 | 46 | 47 | 48 | 49 | 50 | 51 |
| Count | 2 | 19 | 34 | 110 | 204 | 432 | 878 | 1495 | 2237 | 3202 | 4343 | 5179 | 5697 | 5429 | 4865 | 4214 |
| Length | 52 | 53 | 54 | 55 | 56 | 57 | 58 | 59 | 60 | 61 | 62 | 63 | 64 | |||
| Count | 3249 | 2499 | 1735 | 1090 | 657 | 396 | 228 | 141 | 90 | 48 | 18 | 9 | 3 |
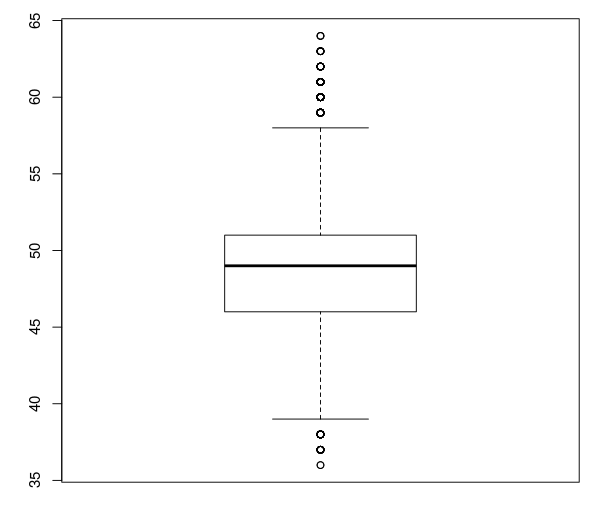
右表可以看出,大部分测序得到碱基长度都集中在46bp到51bp之间
画出箱线图如下
然后我模拟了一个6000bp的基因组,做同样的模拟测序看看评价测序长度分布情况:
| Length | 39 | 40 | 41 | 42 | 43 | 44 | 45 | 46 | 47 | 48 | 49 | 50 | 51 | 52 | 53 | 54 | 55 | 56 | 57 | 58 |
| Count | 9 | 22 | 96 | 207 | 322 | 382 | 479 | 671 | 770 | 714 | 706 | 546 | 424 | 232 | 182 | 100 | 52 | 30 | 14 | 21 |
| Length | 59 | 60 | 61 | |||||||||||||||||
| Count | 15 | 5 | 2 |
可以看出这次的测序片段集中在45到51bp
perl操作excel表格
perl这个语言已经过时很久了,所以它的模块支持性能不是很好,暂时我只看到了对excel2003格式的表格的读取写入操作。
以下是我参考Spreadsheet::ParseExcel这个模块写的一个把excel表格转为csv的小程序,大家也可以自己搜索该模块的说明文档,这样学的更快一点!
[perl]
#!/usr/bin/perl -w
# For each tab (worksheet) in a file (workbook),
# spit out columns separated by ",",
# and rows separated by c/r.
use Spreadsheet::ParseExcel;
use strict;
use utf8;
use Encode::Locale qw($ENCODING_LOCALE_FS);
use Encode;
my $filename ="test.xls";#输入需要解析的excel文件名,必须是03版本的
my $e = new Spreadsheet::ParseExcel; #新建一个excel表格操作器
my $eBook = $e->Parse($filename); #用表格操作器来解析我们的文件
my $sheets = $eBook->{SheetCount}; #得到该文件中sheet总数
my ($eSheet, $sheetName);
foreach my $sheet (0 .. $sheets - 1) {
$eSheet = $eBook->{Worksheet}[$sheet];
$sheetName = $eSheet->{Name};
my $f1 = encode(locale_fs => $sheetName); #每次操作中文我都很纠结,还得各种转码
open FH_out ,">$f1.csv" or die "error open ";
next unless (exists ($eSheet->{MaxRow}) and (exists ($eSheet->{MaxCol})));
foreach my $row ($eSheet->{MinRow} .. $eSheet->{MaxRow}) {
foreach my $column ($eSheet->{MinCol} .. $eSheet->{MaxCol}) {
if (defined $eSheet->{Cells}[$row][$column])
{
print FH_out $eSheet->{Cells}[$row][$column]->Value . ",";
} else {
print FH_out ",";
}
}
print FH_out "\n";
}
close FH_out;
}
exit;
[/perl]
Perl的电子书打包下载!
我看到总是有人问我perl在生信方面的书,这里推荐一下我以前看到的一个帖子,因为书籍比较大,我就没有下载,这样它们在115网盘里面,下载可能会有一点麻烦的,但是它们都是mobi格式的,可以转换成epub格式,这样所有的电子书阅读器都可以阅读,绝对不是扫描版,全文字版!
我的网盘里面是精选的,可能会更有用一点
http://club.topsage.com/thread-2818785-1-1.html
里面有很多生物信息学的perl书籍
打包下载地址:
http://115.com/file/c2h0mgg2#
mobi_collection_2012-04-16(86_books).7z
以下是书目录
Perl/Advanced Perl Programming, 2nd Edition.mobi
Perl/Automating System Administration with Perl, 2nd Edition.mobi
Perl/Beginning Perl for Bioinformatics.mobi
Perl/Beginning Perl Web Development - From Novice to Professional.tpz
Perl/CGI Programming with Perl.mobi
Perl/Effective Perl Programming.mobi
Perl/Higher-Order Perl.mobi
Perl/Intermediate Perl.mobi
Perl/Learning Perl, 5th Edition.mobi
Perl/Learning Perl, 6th Edition.mobi
Perl/Mastering Algorithms with Perl.mobi
Perl/Mastering Perl for Bioinformatics.mobi
Perl/Mastering Perl.mobi
Perl/Mastering PerlTk - Graphical User Interfaces in Perl.mobi
Perl/Perl & LWP.mobi
Perl/Perl Best Practices.mobi
Perl/Perl by Example, 4th Edition.mobi
Perl/Perl Cookbook.mobi
Perl/Perl For Dummies.mobi
Perl/Perl Hacks - Tips & Tools for Programming, Debugging, and Surviving.mobi
Perl/Perl Pocket Reference.mobi
Perl/Perl Testing - A Developer's Notebook.mobi
Perl/Practical Text Mining with Perl.mobi
Perl/Pro Perl Parsing.tpz
Perl/Pro Perl.tpz
Perl/Programming Perl - Unmatched power for text processing and scripting, 4th Edition.mobi
Perl/Programming Perl, 3rd Edition.mobi
Perl/Programming the Perl DBI - Database programming with Perl.mobi
Perl/Randal Schwartz's Perls of Wisdom.tpz
Perl/The Definitive Guide to Catalyst - Writing Extensible, Scalable and Maintainable Perl Based Web Applications.mobi
Advanced Programming in the UNIX Environment, 2nd Edition.mobi
Agile Project Management with Scrum.mobi
Apache Security.mobi
Backup & Recovery.mobi
Beginning iOS 5 Development - Exploring the iOS SDK.mobi
Beginning Rails 3 (Expert's Voice in Web Development).mobi
Clean Code - A Handbook of Agile Software Craftsmanship.mobi
Core Java, Volume I--Fundamentals, 8th Edition.mobi
Core Java, Volume II--Advanced Features, 8th Edition.mobi
Cpp Primer, 4th Edition.mobi
Dreamweaver CS5.5 Mobile and Web Development with HTML5, CSS3, and jQuery.mobi
Erlang Programming.mobi
Essential System Administration, 3rd Edition.mobi
Even Faster Web Sites.mobi
Hacking Vim 7.2.mobi
Hacking-The Art of Exploitation, 2nd Edition.mobi
Hacking-The Next Generation.mobi
High Performance MySQL, 3rd Edition.mobi
High Performance Web Sites.mobi
IPv6 Essentials.mobi
Java The Complete Reference, 8th Edition.mobi
JavaScript - The Definitive Guide, 6th Edition.mobi
Joomla! Programming.mobi
Land of Lisp.mobi
Learning GNU Emacs, 3rd Edition.mobi
Learning PHP, MySQL, and JavaScript.mobi
Learning Python, 3rd Edition.mobi
Learning the bash Shell, 3rd Edition.mobi
Learning the vi and Vim Editors.mobi
Linux Kernel Development, 3rd Edition.mobi
Mac OS X for Unix Geeks.mobi
Managing Projects with GNU Make, 3rd Edition.mobi
Mastering Regular Expressions.mobi
Mercurial The Definitive Guide.mobi
MySQL High Availability.mobi
MySQL Stored Procedure Programming.mobi
Nagios System and Network Monitoring, 2nd Edition.mobi
PhoneGap Beginner's Guide.mobi
PHP and MySQL Web Development, 4th Edition.mobi
Pro jQuery Mobile.mobi
Programming in C, 3rd Edition.mobi
Programming in Objective-C, 4th Edition.mobi
Programming iOS 4 - Fundamentals of iPhone, iPad, and iPod touch Development.mobi
Python for Unix and Linux System Administration.mobi
Real World Haskell.mobi
Ruby on Rails 3 Tutorial - Learn Rails by Example.mobi
Sed & awk, 2nd Edition.mobi
Steve Jobs.mobi
The Art of SEO, 2nd Edition.mobi
The Rails 3 Way, 2nd Edition.mobi
The Ruby Programming Language.mobi
Time Management for System Administrators.mobi
Unix and Linux System Administration Handbook, 4th Edition.mobi
UNIX Power Tools, 3rd Edition.mobi
vi and Vim Editors Pocket Reference.mobi
Website Optimization.mobi
Bowtie算法第六讲-tally法对bwt索引进行搜索
因为要讲搜索,所以我选择了一个长一点的字符串来演示多种情况的搜索
perl rotation_one_by_one.pl atgtgtcgtagctcgtnncgt
程序运行的结果如下
$ATGTGTCGTAGCTCGTNNCGT 21
AGCTCGTNNCGT$ATGTGTCGT 9
ATGTGTCGTAGCTCGTNNCGT$ 0
CGT$ATGTGTCGTAGCTCGTNN 18
CGTAGCTCGTNNCGT$ATGTGT 6
CGTNNCGT$ATGTGTCGTAGCT 13
CTCGTNNCGT$ATGTGTCGTAG 11
GCTCGTNNCGT$ATGTGTCGTA 10
GT$ATGTGTCGTAGCTCGTNNC 19
GTAGCTCGTNNCGT$ATGTGTC 7
GTCGTAGCTCGTNNCGT$ATGT 4
GTGTCGTAGCTCGTNNCGT$AT 2
GTNNCGT$ATGTGTCGTAGCTC 14
NCGT$ATGTGTCGTAGCTCGTN 17
NNCGT$ATGTGTCGTAGCTCGT 16
T$ATGTGTCGTAGCTCGTNNCG 20
TAGCTCGTNNCGT$ATGTGTCG 8
TCGTAGCTCGTNNCGT$ATGTG 5
TCGTNNCGT$ATGTGTCGTAGC 12
TGTCGTAGCTCGTNNCGT$ATG 3
TGTGTCGTAGCTCGTNNCGT$A 1
TNNCGT$ATGTGTCGTAGCTCG 15
它的BWT及索引是
T 21
T 9
$ 0
N 18
T 6
T 13
G 11
A 10
C 19
C 7
T 4
T 2
C 14
N 17
T 16
G 20
G 8
G 5
C 12
G 3
A 1
G 15
然后得到它的tally文件如下
接下来用我们的perl程序在里面找字符串
第一次我测试 GTGTCG 这个字符串,程序可以很清楚的看到它的查找过程。
perl search_char.pl GTGTCG tm.tally
your last char is G
start is 7 ; and end is 13
now it is number 5 and the char is C
start is 3 ; and end is 6
now it is number 4 and the char is T
start is 17 ; and end is 19
now it is number 3 and the char is G
start is 10 ; and end is 11
now it is number 2 and the char is T
start is 19 ; and end is 20
now it is number 1 and the char is G
start is 11 ; and end is 12
It is just one perfect match !
The index is 2
第二次我测试一个多重匹配的字符串GT,在原字符串出现了五次的
perl search_char.pl GT tm.tally
your last char is T
start is 15 ; and end is 22
now it is number 1 and the char is G
start is 8 ; and end is 13
we find more than one perfect match!!!
8 13
One of the index is 11
One of the index is 10
One of the index is 19
One of the index is 7
One of the index is 4
One of the index is 2
One of the index is 14
惨了,这个是很严重的bug,不知道为什么,对于多个匹配总是会多出那么一点点的结果。
去转换矩阵里面查看,可知,前面两个结果11和10是错误的。
CTCGTNNCGT$ATGTGTCGTAG 11
GCTCGTNNCGT$ATGTGTCGTA 10
GT$ATGTGTCGTAGCTCGTNNC 19
GTAGCTCGTNNCGT$ATGTGTC 7
GTCGTAGCTCGTNNCGT$ATGT 4
GTGTCGTAGCTCGTNNCGT$AT 2
GTNNCGT$ATGTGTCGTAGCTC 14
最后我们测试未知字符串的查找。
perl search_char.pl ACATGTGT tm.tally
your last char is T
start is 15 ; and end is 22
now it is number 7 and the char is G
start is 8 ; and end is 13
now it is number 6 and the char is T
start is 19 ; and end is 21
now it is number 5 and the char is G
start is 11 ; and end is 12
now it is number 4 and the char is T
start is 20 ; and end is 21
now it is number 3 and the char is A
start is 2 ; and end is 3
now it is number 2 and the char is C
start is 3 ; and end is 3
we can just find the last 6 char ,and it is ATGTGT
原始字符串是ATGTGTCGTAGCTCGTNNCGT,所以查找的挺对的!!!
[perl]
$a=$ARGV[0];
$a=uc $a;
open FH,"<$ARGV[1]";
while(<FH>){
chomp;
@F=split;
$hash_count_atcg{$F[0]}++;
$hash{$.}=$_;
# the first line is $ and the last char and the last index !
}
$all_a=$hash_count_atcg{'A'};
$all_c=$hash_count_atcg{'C'};
$all_g=$hash_count_atcg{'G'};
$all_n=$hash_count_atcg{'N'};
$all_t=$hash_count_atcg{'T'};
#print "$all_a\t$all_c\t$all_g\t$all_t\n";
$len_a=length $a;
$end_a=$len_a-1;
#print "your query is $a\n";
#print "and the length of your query is $len_a \n";
$after=substr($a,$end_a,1);
#we fill search your query from the last char !
if ($after eq 'A') {
$start=2;
$end=$all_a+1;
}
elsif ($after eq 'C') {
$start=$all_a+1;
$end=$all_a+$all_c+1;
}
elsif ($after eq 'G') {
$start=$all_a+$all_c+1;
$end=$all_a+$all_c+$all_g+1;
}
elsif ($after eq 'T'){
$start=$all_a+$all_c+$all_g+$all_n+1;
$end=$all_a+$all_c+$all_g+$all_t+$all_n+1;
}
else {die "error !!! we just need A T C G !!!\n"}
print "your last char is $after\n ";
print "start is $start ; and end is $end \n";
foreach (reverse (1..$end_a)){
$after=substr($a,$_,1);
$before=substr($a,$_-1,1);
($start,$end)=&find_level($after,$before,$start,$end);
print "now it is number $_ and the char is $before \n ";
print "start is $start ; and end is $end \n";
if ($_ > 1 && $start == $end) {
$find_char=substr($a,$_);
$find_len=length $find_char;
print "we can just find the last $find_len char ,and it is $find_char \n";
#return "miss";
last;
}
if ($_ == 1) {
if (($end-$start)==1) {
print "It is just one perfect match ! \n";
my @F_start=split/\s+/,$hash{$end};
print "The index is $F_start[1]\n";
#return $F_start[1];
last;
}
else {
print "we find more than one perfect match!!!\n";
print "$start\t$end\n";
foreach (($start-1)..$end) {
my @F_start=split/\s+/,$hash{$_};
print "One of the index is $F_start[1]\n";
}
#return "multiple";
last;
}
}
}
sub find_level{
my($after,$before,$start,$end)=@_;
my @F_start=split/\s+/,$hash{$start};
my @F_end=split/\s+/,$hash{$end};
if ($before eq 'A') {
return ($F_start[2]+1,$F_end[2]+1);
}
elsif ($before eq 'C') {
return ($all_a+$F_start[3]+1,$all_a+$F_end[3]+1);
}
elsif ($before eq 'G') {
return ($all_a+$all_c+1+$F_start[4],$all_a+$all_c+1+$F_end[4]);
}
elsif ($before eq 'T') {
return ($all_a+$all_c+$all_g+$all_n+1+$F_start[5],$all_a+$all_c+$all_g+1+$all_n+$F_end[5]);
}
else {die "error !!! we just need A T C G !!!\n"}
}
[/perl]
原始字符串是atgtgtcgtagctcgtnncgt
Bowtie算法第五讲-index2tally
前面讲到了如何用笨方法进行字符串搜索,也讲了如何构建bwt索引,和把bwt索引还原成字符串!
原始字符串是ATGCGTANNGTC
排序过程是下面的
$ATGCGTANNGTC 12
ANNGTC$ATGCGT 6
ATGCGTANNGTC$ 0
C$ATGCGTANNGT 11
CGTANNGTC$ATG 3
GCGTANNGTC$AT 2
GTANNGTC$ATGC 4
GTC$ATGCGTANN 9
NGTC$ATGCGTAN 8
NNGTC$ATGCGTA 7
TANNGTC$ATGCG 5
TC$ATGCGTANNG 10
TGCGTANNGTC$A 1
现在讲讲如何根据bwt索引构建tally,并且用tally搜索方法来搜索字符串!
首先是bwt索引转换为tally
C 12
T 6
$ 0
T 11
G 3
T 2
C 4
N 9
N 8
A 7
G 5
G 10
A 1
这个其实非常简单的,tally就是增加四列计数的列即可
[perl]
$hash_count{'A'}=0;
$hash_count{'C'}=0;
$hash_count{'G'}=0;
$hash_count{'T'}=0;
open FH ,"<$ARGV[0]";
while(<FH>){
chomp;
@F=split;
$last=$F[0]; # 读取上面的tally文件,分列,判断第一列,并计数
$hash_count{$last}++;
print "$_\t$hash_count{'A'}\t$hash_count{'C'}\t$hash_count{'G'}\t$hash_count{'T'}\n";
}
[/perl]
输出的tally如下
C 12 0 1 0 0
T 6 0 1 0 1
$ 0 0 1 0 1
T 11 0 1 0 2
G 3 0 1 1 2
T 2 0 1 1 3
C 4 0 2 1 3
N 9 0 2 1 3
N 8 0 2 1 3
A 7 1 2 1 3
G 5 1 2 2 3
G 10 1 2 3 3
A 1 2 2 3 3
接下来就是针对这个tally的查询函数了
Bowtie 算法第四讲
由于之前就简单的看了看bowtie作者的ppt,没有完全吃透就开始敲代码了,写了十几个程序最后我自己都搞不清楚进展到哪一步了,所以我现在整理一下,从新开始!!!
首先,bowtie的作用就是在一个大字符串里面搜索一个小字符串!那么本身就有一个非常笨的复杂方法来搜索,比如,大字符串长度为100万,小字符串为10,那么就依次取出大字符串的10个字符来跟小字符串比较即可,这样的算法是非常不经济的,我简单用perl代码实现一下。
[perl]
#首先读取大字符串的fasta文件
open FH ,"<$ARGV[0]";
$i=0;
while (<FH>) {
next if /^>/;
chomp;
$a.=(uc);
}
#print "$a\n";
#然后接受我们的小的查询字符串
$query=uc $ARGV[1];
$len=length $a;
$len_query=length $query;
$a=$a.'$'.$a;
#然后依次循环取大字符串来精确比较!
foreach (0..$len-1){
if (substr($a,$_,$len_query) eq $query){
print "$_\n";
#last;
}
}
[/perl]
这样在时间复杂度非常恐怖,尤其是对人的30亿碱基。
正是因为这样的查询效率非常低,所以我们才需要用bwt算法来构建索引,然后根据tally来进行查询
其中构建索引有三种方式,我首先讲最效率最低的那种索引构造算法,就是依次取字符串进行旋转,然后排序即可。
[perl]
$a=uc $ARGV[0];
$len=length $a;
$a=$a.'$'.$a;
foreach (0..$len){
$hash{substr($a,$_,$len+1)}=$_;
}
#print "$_\t$hash{$_}\n" foreach sort keys %hash;
print substr($_,-1),"\t$hash{$_}\n" foreach sort keys %hash;
[/perl]
这个算法从时间复杂度来讲是非常经济的,对小字符串都是瞬间搞定!!!
perl rotation_one_by_one.pl atgcgtanngtc 这个字符串的BWT矩阵索引如下!
C 12
T 6
$ 0
T 11
G 3
T 2
C 4
N 9
N 8
A 7
G 5
G 10
A 1
但同样的,它也有一个无法避免的弊端,就是内存消耗太恐怖。对于30亿的人类碱基来说,这样旋转会生成30亿乘以30亿的大矩阵,一般的服务器根本hold不住的。
最后我讲一下,这个BWT矩阵索引如何还原成原字符串,这个没有算法的差别,因为就是很简单的原理。
[perl]
#first read the tally !!!
#首先读取上面输出的BWT矩阵索引文件。
open FH,"<$ARGV[0]";
$hash_count{'A'}=0;
$hash_count{'C'}=0;
$hash_count{'G'}=0;
$hash_count{'T'}=0;
while(<FH>){
chomp;
@F=split;
$hash_count{$F[0]}++;
$hash{$.}="$F[0]\t$F[1]\t$hash_count{$F[0]}";
#print "$hash{$.}\n";
}
$all_a=$hash_count{'A'};
$all_c=$hash_count{'C'};
$all_g=$hash_count{'G'};
$all_t=$hash_count{'T'};
$all_n=$hash_count{'N'};
#start from the first char !
$raw='';
&restore(1);
sub restore{
my($num)=@_;
my @F=split/\t/,$hash{$num};
$raw.=$F[0];
my $before=$F[0];
if ($before eq 'A') {
$new=$F[2]+1;
}
elsif ($before eq 'C') {
$new=1+$all_a+$F[2];
}
elsif ($before eq 'G') {
$new=1+$all_a+$all_c+$F[2];
}
elsif ($before eq 'N') {
$new =1+$all_a+$all_c+$all_g+$F[2];
}
elsif ($before eq 'T') {
$new=1+$all_a+$all_c+$all_g+$all_n+$F[2];
}
elsif ($before eq '$') {
chop $raw;
$raw = reverse $raw;
print "$raw\n";
exit;
}
else {die "error !!! we just need A T C N G !!!\n"}
#print "$F[0]\t$new\n";
&restore($new);
}
[/perl]


